A little background:
My brother, Dr. Lou Feurino, has just opened a private practice. He is a Psychiatrist, Psychotherapist, and working towards becoming an analyst as well. His practice specializes in combination treatment with talk therapy and medications, if needed, for help with problems relating to mood, anxiety, substance misuse, impulsivity, attention, interpersonal relationships, self-harm behaviors, and other issues. Dr. Feurino is trained in cognitive-behavioral, dialectic-behavioral, and psychodynamic psychotherapy, along with the use of medications and the detection of general medical problems that may mimic psychiatric disorders.
This of course means one thing above all else: He needs to have a very comfortable couch.
Like the wonderful sister I am, I undertook the task of designing and making him a custom cushion for his office couch. Additionally, I designed the cushion's custom cover and custom detachable pillow. My brother paid for the cost of materials as well as labor, so really I'm only sort-of-wonderful. But the cushion turned out really nice and is very comfortable to lay on.
Making the cushion:
The couch's surface area measures 27" x 82". If this seems long to you, think of it as more of a chaise...or even, think of a typical analyst's couch. It is however a really large cushion size. The template is a basic rectangle, but all of the template and pieces are my own design.
The reason I had to make a new cushion was because the cushion that had come with the couch was ridiculously uncomfortable. So when picking out the material for the cushion, I (and especially my brother) tried out multiple solutions. We came up with a combination of materials to make up the cushion. The base is made of 2" foam, followed by a store bought fiber-fill mattress topper from Target, cut down to the size of the foam. This was followed by two layers of a store bought fiber-fill comforter from Target, again each layer cut to the size of the foam. I used spray adhesive to keep the fabric pieces laying nicely on each other and so they won't bunch up when people sit/lay on them. The cost was pretty high but my brother was committed to making this cushion something that people would feel very comfortable laying on.
 |
| the foam and a layer of the mattress topper |
 |
| the foam, a layer of the mattress topper, and two separate layers of the comforter |
 |
| the cushion with layers adhered together |
Then, I covered the cushion with batting to hold everything together. My mom helped me hand stitch the batting onto the cushion. Typically, you wouldn't need to sew the batting much (or at all) but because I needed something to tightly hold the cushion together, I needed the stitches.
 |
| top, bottom, and side of cushion with batting sewed on |
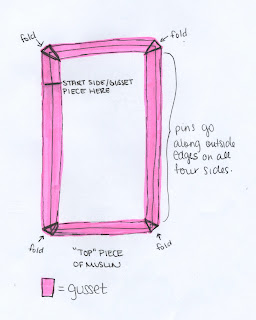
Later on down the line, as I was making part of the cushion cover, I was taking it on and off of the cushion for fittings so many times that I realized the batting wasn't going to hold up to much more abuse. So I went to Jo-Anns and bought 5 yards of sturdy (yet inexpensive) muslin to make a permanent gusseted cover for the cushion so that it will last for a long time. This muslin covering will allow the cover to go off and on without any problems or worry that anything will fall apart. I cut two pieces (the top and bottom) at 27" x 82", purposely not including a seam allowance, because the muslin needed to be tight. I pieced together the rest of the fabric so that I could make sure that the grain of the fabric was going in the same direction as the top and bottom, and this piece became the gusset (this won't be seen, so piecing together wasn't an ugly option). The width of the cushion ended up being about 3", so I cut this gusset piece to 4", thus having .5" of seam allowance on each side. The length ended up being roughly 220". I laid down the "top" piece of muslin (there was no "right" or "wrong" sides for this fabric) and, starting about 1/4 down one of the long sides, I pinned the gusset along, making an overlapped fold at each corner. The reason I started a little farther down the side was so that the gusset would have a nice gathering at each corner (it would be hard to make the corners look nice if the gusset started at the corner).
 |
| maybe this drawing will help you visualize |
 |
| first stitches sewn of muslin cover, side and "top" |
I sewed this, did a fitting which was perfect, and then sewed the "bottom" layer to the other side of the gusset, again making sure to make a nice fold at each corner.
 |
| pinning the "bottom" of the muslin cover to the side (notice the pieced together seams) |
I left one short end un-pinned except for the corners, then sewed, leaving that end open for me to put the cushion into.
 |
| the created muslin cover with end open to slide cushion in |
I flipped it right-side-out, and put the cushion into that cover, then hand stitched the cover shut at the short end. The cushion was finally done!
Here's how it turned out:
 |
| the finished cushion with fitted muslin cover |
I know this was a long post, I hope it was somewhat informative. Read about the making of the cushion cover in my next [long winded] post, soon to follow!
-Victoria
If you, or anyone you know, would like to be in contact with Dr. Feurino, please email him at LouFeurinoMD@gmail.com.

No comments:
Post a Comment